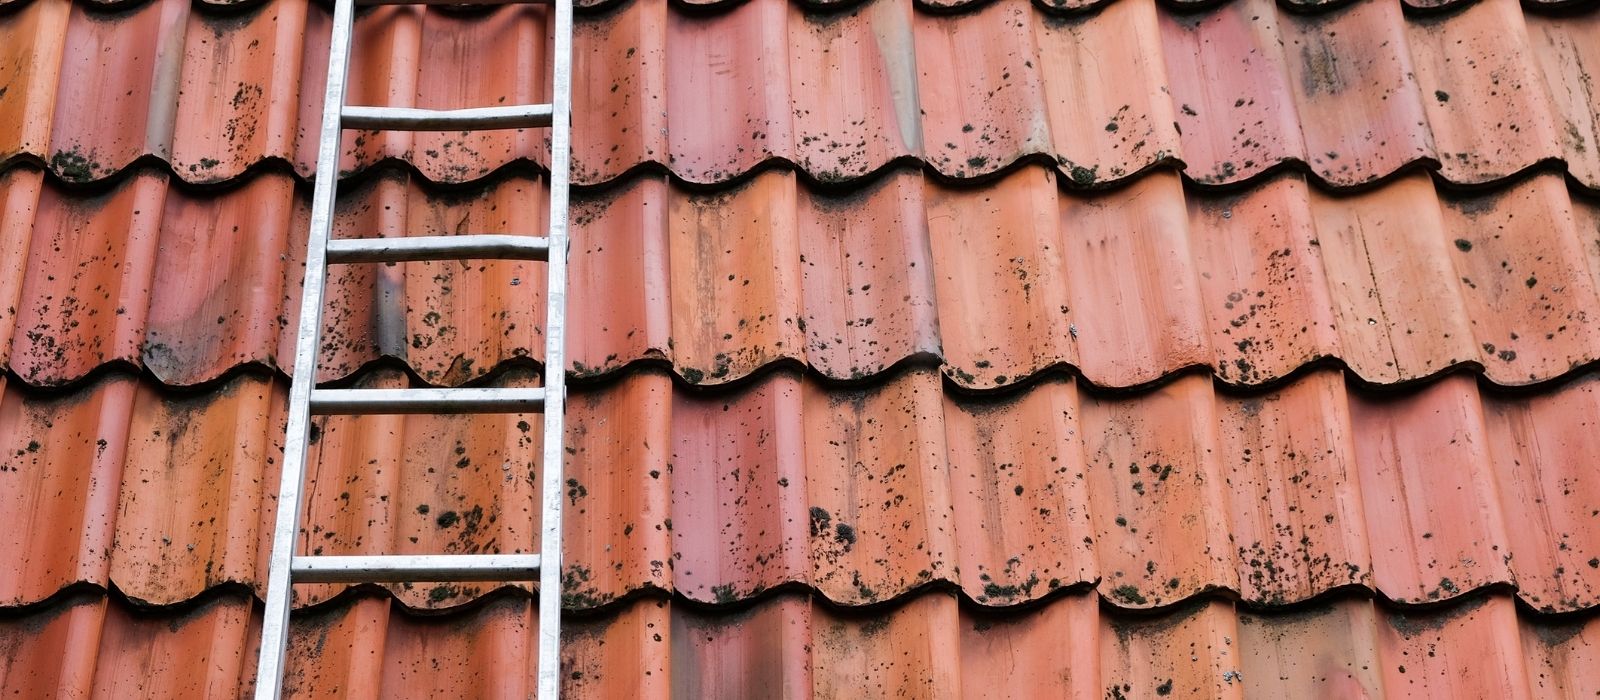
Pitched roof ladder
A pitched roof ladder is a specially designed ladder with a hooked attachment that allows you to climb and access pitched roofs safely.
It can simply slide up an aluminium extension ladder or be pulled up separately getting turned over so the hooked top section sits securely over the ridge line of a roof.
It is the go to choice for those who want and need the extra stability and safety while climbing onto a roof.
A roof ladder is used mainly for maintenance such as repairing broken or slipped tiles, leaks around chimney stacks caused by damaged cement flaunching, dislodged lead flashings and re-cementing gable verges.
They can be especially helpful if your house has more than one story. Pitched roof ladders are usually made from lightweight aluminium and which make them easier to carry and position for their size.
You will also find additional safety latches to lock ladder sections in place so they don’t move. They are an essential tool for the serious home maintenance enthusiast that avoids waiting for a contractor to arrive, (if you can get one!), and paying the cost of a simple fix.
You can read our article on how to clean gutters here!
Roof ladder hooks
Roof ladder hook kit
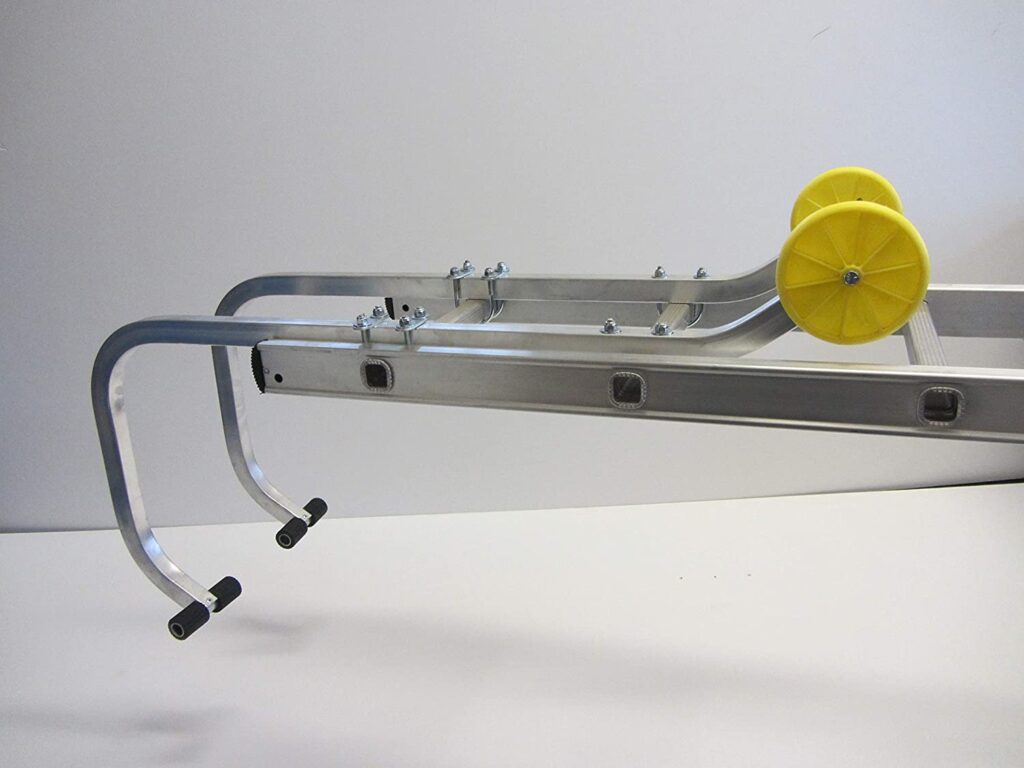
As previously mentioned, a traditional complete roofing ladder comes with the specialised roof hook attachment.
It looks like an awkward piece of kit at first glance and to the untrained person, you wonder how it works.
It comprises of two large hooks in a frame with two small wheels attached.
The wheels are used to help roll the ladder up the roof and over the tiles as you push it. When it reaches just below the ridge tile, the ladder gets flipped over and the hooks secure the ladder preventing it from sliding downwards.
You then climb up the ladder with your weight secured by the hook over.
Roof ladder hooks can come separately from aluminium extension ladders and most, if not all have universal clamps so they can be attached to the smaller top section of ladder as you can see from the photo on the left here.
How to use a roof ladder safely
In order to use a roof ladder safely, there are a few basic instructions to follow. Firstly, before using a roof ladder, or any ladder in fact, inspect it for any signs of wear and tear or damage.
If the roof ladder has been in storage for an extended period of time, be sure to check its condition.
Next, make sure you have secured your roof ladder hook attachment properly, preferably to the manufacturers instructions. Failure at this point could cause someone to fall from their roof if it detaches.
They usually have secondary safety features however. This can take the form of a specially design bracket or ‘U’ shaped brackets which require bolting.
One thing that can be tedious is the thought of climbing up and down to get tools or equipment. You would be amazed with the amount of ladder accessories out there that make your life easier.
You can read more about these in our article on ladder accessories here.
Next, make sure the roof ladder is set up properly on a firm surface that won’t cause it to slip or slide. Setting a ladder up on soft ground like a lawn may cause the ladder to punch into the lawn making it not sit level.
Finally, before climbing onto your roof with your roof ladder in hand, double check if there any power lines running nearby! I know it seems drastic but power lines at lower levels are usually 11 KV and if close enough, can arc to a metal ladder.
If you are unsure, seek further advice from your electricity supplier. Personally, when I have used a roofing ladder to carry out repairs, I wear a body harness. Not everybody does but I do.
I feel a lot safer when I am attached to the top section with a short lanyard. I know that if I slip, the harness attached to the ladder which is hooked over the ridge will stop me falling from the roof and hitting the ground!
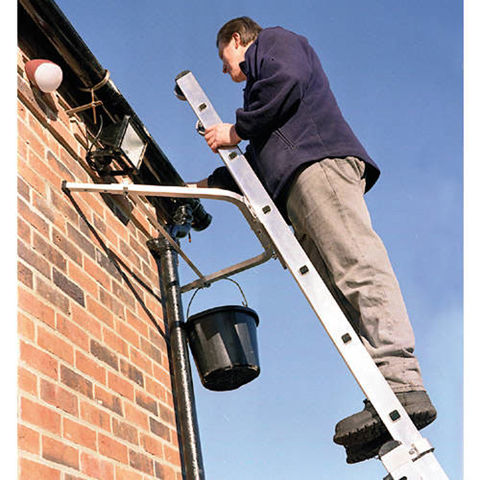
So, you have a firm and stable footing. You position your triple aluminium ladder adjacent to where your roof repair is located. You then start to extend the second part of your triple ladder to the height of the eaves where your guttering is located.
Here, you would be at an advantage if you also had a ladder standoff bracket, especially if you have deep soffits. You really want the top of the ladder to be on the brickwork, not your plastic or wooden facia or your guttering!
The ladder could move sideways, especially if wet. You can read our article on standoff brackets here.
A ladder standoff bracket gives you much greater stability and also makes it a lot easier to climb onto the roof ladder section.
As you now start to climb, you gradually push the third ladder section up the second section as you climb.
You then push it onto the roof with the wheels facing downwards so it rolls up the roof tiles.
When at the top of the ridge, you flip over the ladder so the hooks go over the ridge. At this point, this is when you would attach your lanyard to the top section so you can’t fall.
Some people have the hooked ladder section pulled up separately and not pushed up but it can be easier if you are working alone.
To take it down, you just reverse the process taking it slowly and surely. The very well executed training video here demonstrates how a roof ladder is deployed.
He takes some extra steps like drilling an extra securing bolt into the brickwork which is a great additional step. He’s also wearing a safety harness which he attaches.
Best roof ladders
If you have the confidence, the cost of triple aluminium ladders, a standoff bracket and roof hook attachment could be the same as calling someone out to carry out a simple fix on your roof.
Just because they have the same set! You would also have them for a lifetime. If you live amongst trees, storm damage could fell branches and persistent growing moss can cling to tiles and fill or block gutters.
A full set of ladders would be at always at hand. We have put forward some of the best examples we could find along with some essential accessories for you.
Triple extension ladders
3 Section Trade Master Extension Ladder with Integral Stabiliser

What we like:
Great Amazon rating
Load capacity of 150 Kg (23.5 Stones!)
Comes with a stabiliser bar
Lifetime guarantee
Comes in several sizes
What could be better:
The larger sizes can feel heavy
Stabiliser bar needs fitting
There are a few reasons why we like this extension ladder from Trade Master. Firstly, it comes with an integrated stabiliser bar to increase the footprint of the bottom section giving you increased grip and stability.
Another great feature as we talked about earlier, auto locking clamps hold the ladder sections securely together which makes the ladder much safer and a lot more comfortable to use.
These ladders are also tested and certified to the latest EN131 safety standard which means that they will more than cope with jobs around the home but are also tough enough to be used daily by tradesmen.
The integral stabiliser bar offers greater stability when compared to other ladders that don’t have one. Be mindful that the instructions and sequence fitting its eye bolts needs to followed or you might end up in a pickle!
The ladders feel very well made and very robust so this can make the larger variants of these ladders feel quite heavy but that’s natural we feel if you have larger sections.
The advantage to having these ladders come in various size combinations is that you can buy exactly what you need and not have to get a bigger, more expensive size.
The homeowner with a pitched roof bungalow will need a smaller set than someone with a 3 storey house for example.
The final feature which makes this our choice, is that even with current Health & Safety rules, the bottom two sections cannot be separated, the third section can be detached so that a roof hook kit can be bolted to it and handled separately!
Roof ladder hook kit
Ladder Roof Hook Kit – Conversion Accessory by BWT
What we like:
Great Amazon ratings
Lightweight aluminium
Heavy duty wheels
What could be better:
The ‘U’ bolt brackets can be fiddly at first but very sturdy when fitted

This roof hook kit turns your extension ladders into roof ladders by giving you safe access using the ridge hook over the ridge line of your home.
It’s universal so fits to most extension ladders for fast and easy adaption into a safe roof ladder. It’s made from aluminium so it’s light and strong, also with robust wheels.
This roof hook kit can be easily attached and left on or be detached for later use.
Ladder standoff bracket
Universal ‘Complete’ Ladder Standoff/Stay/Stand Off
What we like:
Amazon Choice
Unique resting plate for tools or paint pots
Also incorporates a V shape design
Rubber pads on flat and within the V shape
What could better:
A little heavier than other types because of the flat tool plate design
A little more expensive (but worth it!)
We really like this ladder standoff as it has a unique design of an extra strong alloy tray with a slip resistant surface. It is set inside the ladder standoff and has been designed specifically to rest tools on or even a pot of paint that you might need to complete your task.
This Amazon top choice also benefits from being able to be used on the corner of your property or straddling rainwater downpipes because of its ‘V’ shaped design.
It supports the ladder 360mm (or 1 foot 4 inches in old money!) away from the wall to comfortably enable you to reach into your gutters clearing those dead leaves.
Made from heavy duty aluminium, it is a little more heavier than the other examples. This due to the inside tool and materials resting plate but we think this is a minimal trade off.
It’s also marginally more expensive but it’s really down to the unique design features. There are 4 thick rubber wall pads that rest against the wall and two within the angle to prevent the ladder from slipping but also to protect your property.
We like that the internal ‘V’ angle has the additional rubber buffers. It’s also easy assembly with just 5 bolts and fits any ladder in seconds.
It comes with full fitting instructions in plain English and has a full lifetime guarantee.
Note: The tool and material resting plate is exactly for that and mustn’t be stood on!
Additional safety – Safety Harness
Safety harness and lanyard
Note: Please remember when putting on a safety harness to follow the manufacturers instructions and always check for the latest up to date guidelines about having your harness checked.
You must also think carefully about your anchor point for the lanyard. Always go for a fixed length lanyard for the roofing works we’ve discussed.
Always have the anchor point as high as possible so it reduces the amount of slack in the lanyard. As a guideline, typically with a 2m lanyard, when attached at head height, you would need to ensure you are 5m above the ground.
If you fall, you have 2m of lanyard, you maybe almost 2m in height and you need 1m clear for safety. I hope that makes sense.
CGPK7 Complete safety fall arrest kit: Two link harness, lanyard plus 2 carabiners.
What we like:
Comes as a complete kit
Perfect for roofs
One size and adjustable
What could be better:
Not much for price point!
Lanyard is only 0.8m long. Perfect for attaching to a roof ladder however.

This harness comes with two link points, a pair on the front and the main metal looped at the rear. Tested to EN 361 and the lanyard webbing to EN354, you can ensure this will save your life.
The lanyard is only 0.8m in length. This means that it possibly could be problematic for some users like scaffolders but perfect for attaching to a roofing ladder.
Also coming with two carabiners, you won’t need anything else.
Final thoughts
Okay, so you’re thinking about carrying out that essential roof fix or that maintenance you’ve been meaning to do. We’ve discussed everything you’ll need to do those jobs safely.
These namely are the ladders, the standoff bracket, the roof hooks and a safety harness just in case. Contractors are becoming more scarce and as a consequence, their demand has risen, along with their rates.
For the price of getting in a contractor (if you can find one), it could equate to the same cost as getting your own kit. You then have it at your disposal.
This could be quite often if your home is surrounded by trees and the implications of that. It could be falling leaves blocking guttering and downpipes, moss on your roof or even a fallen branch damaging tiles or a chimney stack.
Click here to see our full range of articles on access and accessories.